Alright Then. Full Steam Ahead

Friday, August 23, 2019
Wednesday, August 21, 2019
The Dear Estate, 3

When we last left off, windows were going in, final paint touch ups were being made, and the house was getting some interior detailing in the form of curtains and black walls.
 I drilled a few holes in the bottom of the base, and ran two warm glow LEDs into the house. These give off a very soft glow that lights up the kitchen, and the parlor. I figure at night, it was better to have a warm hint of gas-lamps burning then to have the house lit up like Christmas. As Lady and Tramp would have a hard time sleeping (and Jim Dear's gas bill would be through the roof) if it was blazing with light. However, a future project could be to add a Woodland Scenics Just Plug Lighting System, and be able to control the lighting. However, that might have to wait until a full scale layout for the model to find a home.
I did try to take photos of the lighting rig, but it turned out my phone was set to record. So, no photos were taken. Instead it was a bad-video. Oops.
Once the diorama base had it's static grass dry, the house itself went onto the footprint and was anchored down with a few daps of liquid nails. Should it ever need to come up again, a putty knife will be all that is required. We ca now turn our attention to the landscape.
 The grounds around the house seem to change as the films progress through the seasons. As I made a note in the second installment of this build, as
the Lady and the Tramp franchise covers a point of time of about
five
years, and the house seems to go through several stages of decor and
grounds-keep. In the first act of the
1955 film, the house is immaculate. With plenty of plant life, shrubs,
and flowerbeds. In the second act, during the birth of the baby, the
house's grounds become a little plainer. With more general shrubbery.
More then likely, keeping up with the flowerbeds was put on hold for the
arrival of the baby. The house remains like this until the 2nd film,
which seems to have a happy middle-ground between a highly polished and
well kept yard, and the reality that seven dogs live here. A nice touch from the Disney crew.
The grounds around the house seem to change as the films progress through the seasons. As I made a note in the second installment of this build, as
the Lady and the Tramp franchise covers a point of time of about
five
years, and the house seems to go through several stages of decor and
grounds-keep. In the first act of the
1955 film, the house is immaculate. With plenty of plant life, shrubs,
and flowerbeds. In the second act, during the birth of the baby, the
house's grounds become a little plainer. With more general shrubbery.
More then likely, keeping up with the flowerbeds was put on hold for the
arrival of the baby. The house remains like this until the 2nd film,
which seems to have a happy middle-ground between a highly polished and
well kept yard, and the reality that seven dogs live here. A nice touch from the Disney crew. As I'm modeling the house as it appeared in the first film, I decided to keep the grounds simple and aim for a point in time towards the end of the film. The Tramp is a member of the family, and he an Lady are expecting their litter. The grounds are well kept, Darling has her flower beds, yet the immaculate pruning has given way to things being a bit more easy to keep. With a child in the mix, and four pups on the way, there isn't much time for extreme garden makeovers .
 A blend of Woodlands Scenics bushes and ground-foam mixed with Scenic Express Leaves made up the shrubs, which boarder the house on all four sides, as well as make up the majority of the garden between the brick sidewalk and the house itself. A few vines grow up the back side of the house above the cellar door. (One would think after the midnight rat-invasion, these would be pulled down....oh well. I guess seven dogs in the house might keep the rats at bay.)
  Time to turn to the trees. Trees can make or break a model, as well as set the tone for the season and location. In my side yard, I happen to have a bush that gives off some very nice twigs that can be turned into scale armatures for trees. I've seen some people use salt-bushes for trees with larger trunks, as well as use magnolia plums to even represent the foliage. I try to clip my trunks from branches that are already dead, but one can clip the foliage off and dry out the green wood if need-be.
 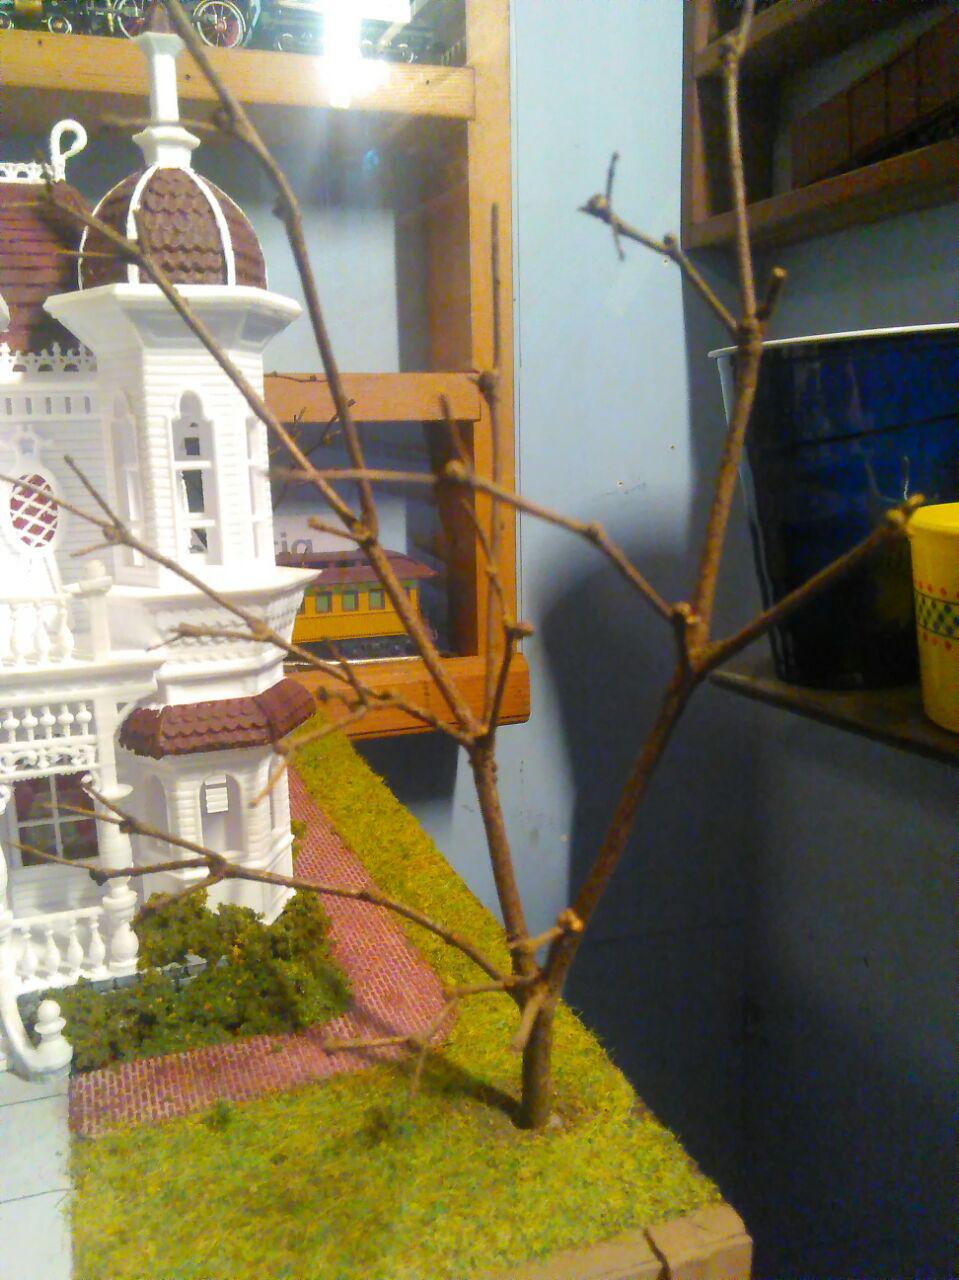 I fill two tins, one with fine turf from Woodlands Scenics, the other with coarse turf/bushes. Using a spray adhesive, I hit just the branches of the armature, careful to be sure I don't spray the trunk itself. The armature is first dipped in the fine turf. Sometimes I even roll it around and fluff the turn up and over the branches burying them. This provides the foundation for the much larger coarse turf material. Another spray over the armature again, and into the tin of coarse turf and bushes. There is no number of dips or sprays, now amount of material. You just keep going until you feel happy with the result. I tend to try and keep an airy feel, rather then load the branches up. However, in some cases, branches will gather more material then others. There is no right or wrong, and much like nature, each tree will have an individual look.
Once the tree has enough material to satisfy me, a final spray of adhesive is done to coat the whole tree. I use Krylon Artist Spray, Acrylic Crystal Clear. This
tough, clear finish does not yellow with age and it protects color with a moisture-resistant finish that holds the material in place and seals it. I've seen other modelers use hairspray, however I've never had much luck with that.
Now, a word of warning...these trees will shed, sometimes over the course of a few days, as things settle and the finish seals. The finish will protect the majority of the material in the branches, but I tent to leave the trees in a foam base in the garage to dry out for a few days before using them. Just to be sure that all the loose material gets gathered up for re-use.

The final touch is the wrought iron gate and fence in the front yard. The one that Jim Dear never keeps open. The design of this gate...once again...seems to change slightly from film to film, or even from one animator to another. It has a few basics, like the side fences being much smaller and shorter then the gates. More then likely due to the height of the retaining walls making up for the lost height in the fence itself. I had a gate left over from another project, and I decided to make the fence itself from cardstock. I first drew out the design in led pencil to make a small template. Then, the template was used to draw the same shape repeatedly on the card-stock until I had the length I required.
 Now, comes the tedious part. Using an X-acto blade, I carefully cut the fence out. There is no real way of making this process go fast. All once do is put some tunes on, blank out to the rest of the world, and get it done. I actually made far more then I needed, but I wanted to have some excess in case I effed up somewhere.
The fence was glued in place to follow the retaining wall, and the gate went in, glued in the open position so that it wouldn't obstruct the view of the front of the house when viewed at street level. (Lady must be visiting Jock and/or Trusty)

The last touches where a few outdoor details. Such as the post for the laundry in the backyard, the water barrels under the gutters, and a few flowerpots on the porch. The last thing done to the model was some black dry-brushing around the chimney, and some dry brushing on the room to bring out the edge of the shingles.
 After four months of build, plus far more time in planning, the Dear Estate is as complete as it's going to be for the moment. This experiment in 3D printed model-making brought upon a number of lessons for those thinking about using the medium for large scale modeling. I have to extend a big thank you to Chris and the guys at GoldRushBay Models for getting this thing off the ground and providing the means to design and print. Their prints are fantastically crisp, clear, and finely detailed. The fact that they do custom work is the icing on the cake and I can not recommend them enough for what they do.
  However, I can not say that this style of model building is any easier or cheaper then the alternatives. On one hand, The advantage of 3D design is that it does allow for a clearer idea of
what the final product will look like. If designed properly,
assigning the right relationships to dimensions, changes can be made
downstream that will allow the entire design to be updated with a simple
input of a number. Really, a good 50% of the build occurs in this stage. Between gathering the material from the prototype, and then processing that into a printable model.
However, I can not say that this style of model building is any easier or cheaper then the alternatives. On one hand, The advantage of 3D design is that it does allow for a clearer idea of
what the final product will look like. If designed properly,
assigning the right relationships to dimensions, changes can be made
downstream that will allow the entire design to be updated with a simple
input of a number. Really, a good 50% of the build occurs in this stage. Between gathering the material from the prototype, and then processing that into a printable model. 
However, it doesn’t make the process of building models any faster, in fact it is much, much slower. To design a structure, especially one like the Dear House with all it's Victorian architecture, it takes a fair amount of time. Far more than most people imagine. The advantage of the printer is that once the design is complete and tested, you can create a very finely detailed structure that conforms to all the complexity of a prototype. Then, after printing comes all the prep to take the model to a standard of presentation. Cleanup, sanding, more clean up....more sanding. Hours with a dental pick going at tiny little lines of filament. (and I'm still not convinced I got all of them) then, painting the unit as a whole is a study in patience and skill. If I had to do this project again, I think I would have tried to have the print done in multiple parts that could be glued together. Just to give better access and ease of cleaning and painting.
The finished models always looks fantastic, if the design is done correctly. But it is by no means an effortless or quicker way to get a scratch built model, just a more rigid way to scratch build a specific model.

"We've made a home from which we'll never roam.
In our small, little, not too big
Little, homey, nice, little
Quaint, little, Always friendly home,
Little, homey, nice, little
Quaint, little, Always friendly home,
Welcome!!"

Subscribe to:
Posts (Atom)