Friday, November 1, 2019

Progress Report 3

Ah, another two months have passed. Let's see what got off the workbench. 


 On the layout side of things, both mainlines were finished just in time for the decision to be made that a crossover from track 1 to track 2 would be beneficial. I tend to call these two tracks the "mainlines" in reference to their locations as an NMRA module. However, the truth is track 1 is the engine-house and yard lead while track 2 is actually the main line proper. Thus, the need for a crossover to allow access to the engine-house lead without having to go through the yard, and vice versa. 


One might note a subtle change in the track structure. It turns out Walmart sells HO scale cross ties! They just don't brand them as HO scale cross ties! Tyler Rogers put me onto this, where these wooden stirring sticks can be cut in half and made into scale length wooden ties. They only cost $2.50 for a pack! Also, both mainlines are elevated on proper roadbed, rather then being at ground level such as the lead and work tracks. The historical W&A RR was originally laid on a roadbed of dirt and clay. It was graded out to be capable of holding two tracks. Although ultimately only one was laid. By the 1880s, the railroad had been regraded, ballasted, and re-ballasted. I'm modeling the railroad with a layer of cinder as the roadbed, with dirt and clay shoulders as originally graded. 


This design also matches the color and level of the tracks as seen in "Lady and the Tramp." A happy bonus. The cross over will likewise be made of stub switches, and two harp switch stands from Precision Scale have been obtained. Once this has been completed, work can turn to the turntable and turntable pit. To which Tyler Rogers has been dutifully working on when he isn't busy beating his head into the club's own steam facility. (More on that later) I can not thank Tyler enough for his work on this project. If there is something about this hobby I enjoy, it's sharing it with others and pooling our skills. 


Other projects include building structures for the layout. These include a switchman's shanty modified to look close to the one seen in Lady and the Tramp, building a working coal tipple, building a water tank with movable spout, and this big project...the roundhouse itself.

The roundhouse will get an update all it's own. In this post, let us look at the coal tipple. 


The tipple was given to me second hand as a kit from unknown origins. It was put together originally by Charlie Strike for his layout back in the 1980s. When I got it, it had been reduced back to it's kit form and needed a lot of love. I went back and forth on the use of a coal tipple over a coal stage. Stages were very popular in the 19th century at locomotive service depots. Usually a dock with a small crane, coal would be loaded into locomotive tenders by use of a large tin bucket hoisted by the crane. It was a laborious and time consuming task. The coal tipple reduced the amount of overhead required, and was capable of servicing more locomotives. Being that Marceline was intended to be an intermediate point on the railroad, where locomotives on trains where changed and serviced, having a coal tipple would seem the logical route.  


The tipple is made from strip wood, and to make it operate a small loop was affixed to the bottom of the shoot. This allows a length of music wire to be hooked into the loop, and raise and lower the chute based on the orientation of a Tortoise switch machine under the layout bench-work.

I'm pretty pleased with the way the tipple came out. Rebuilt, weathered with Micromark "Age It Easy" and detailed with the operating chute, it will hopefully become a centerpiece on the W&ARR. 

Marceline Track Plan V2.0. As designed by Tyler Rogers (It's already outdated.)


                                ************

September was also the month of the week long club set up at the Gwinnett County Fairgrounds. This show is one of the more well attended shows our modular club attends. The layout is set up in an exhibit builder on the fairgrounds, and is open to the public during fair hours. This years layout was simple to the point of being almost boring. However the general public enjoyed the show, and the camaraderie of friends more then made up for the last of variety in the track plan.


                                  ***************

Other building projects included this signal tower for Marceline's crossover. This kit is made by Minikits, and was a pretty strait forward build. Once primed and painted, the four walls were assembled atop a custom foundation made from bass wood to represent a deck platform. This kit is unique in that it has the trim and the wall sections molded individually. Which makes painting a real breeze. The structure is painted in the W&A's signature colors of oxide red trim and whitewash. I'm not exactly sure how I settled on these colors. As the white buildings would weather pretty quickly. However, the whitewash typically would be used as a cheap sealant. Traditional whitewash is made by mixing powdered lime with water. It aids in sanitation by coating and smoothing over the rough surfaces. In the end, I like the look as it gives the railroad a very neat and tidy appearance. 
 
Inside, the upstairs area is detailed with a wood board by board floor, a small railroad interlocking machine, one signalman, and his desk. The pan for this structure is to have it with a signal bridge with pan and ball signals that can rotate. These would be mounted to the signal bridge over each corresponding track, and consist of a round disk, or vane, that rotates against a painted white board to provide an extra level of viability. An operating design of which Tyler and I are scratching our heads over. More on that as is comes. 

For information about early railroad signals, I highly recommend J. B. Calvert's website Early Railway Signals. 


Thursday, September 12, 2019

Rail-Moment: Septimus Norris and his Crampton

There are people in this world, who no matter how well they do, or how many successes they achieve, it's that one grand failure that sets them up for life. The one thing that everyone remembers above all, and no matter what you do, you can't seem to get away from. Here’s one of those grand flops. So grand in fact, that it caused a locomotive builder to shut down, and stained the reputation of one of America's most inventive designers. All thanks to a misunderstanding of physics, and the French. 


Septimus Norris (1818 to 1862) was one of America's more earlier locomotive designers, and he seemed to have a bit of a cloud over him. He did hit some home runs though. He built the first 4-6-0 ten-wheeler, helped pioneer level cylinders, and was one of the more influential people who developed the 4-4-0 wheel arrangement. Probably his most successful design was the pilot truck. This was a center-pivot two axle wheel-set. Arguably one of the best all-American locomotive innovations of the 1800s, and a key to unlocking the abilities of the 4-4-0.
A Norris, exported to the UK.
It's flexibility locomotives on uneven track no matter how sloppy the construction. Perfect for hastily constructed American right of ways that climbed over mountains and twisted through valleys. (The British had a knack to overbuild their roadbeds and make their track-work stupid perfect, so they never really saw the need for a pilot truck. That’s why you rarely see them on UK locos until the 20th century.)


However, he wasn’t exactly an exceptional designer either. Plenty of his innovations just outright didn't work, or some unforeseen circumstance thwarted it between the design table, and reality. One has to remember that while these men were educated in a sense, simple physics wasn’t simple to a generation of do-it-yourself steam engineers building the very foundations of an industry. Most were better at iron casting and blacksmithing than at figuring weights, wheel adhesion, and tractive effort tables. Almost all master mechanics from those years got their education by the school of hard knocks via an apprenticeship, not no fancy books. (In fact, most of them were writing the books on steam engineering) 

The Norris 4-2-0, one of the more successful designs.
The Norris Locomotive Works was started in 1832 as the American Steam Carriage Company by older brother William Norris and Major Stephen H. Long. The two men had experimented with steam engine building for years and had a few solid designs under their belt. Major Long later left the firm and William Norris was joined by his brother Septimus, who patented several locomotive-related inventions. The two brothers reformed the enterprise into the Norris Locomotive Works.


When Septimus took over the management of the spanking brand-new Schenectady Locomotive Works in 1848, he thought he had a foolproof scheme for success. There was a spanking new type of locomotive design circulating around in Europe, where the Norris brothers had a few, shall we say, business connections (see spies) and the plans for this new design had been surreptitiously re-routed to Septimus’ back pocket like a downloaded youtube video.


The design had been the 1845 brainchild of one Thomas Russell Crampton in England, and it was said by many who drink tea to be the best design for a high-speed passenger locomotive. It had been common knowledge for a while that the best way to get a fast machine was to give it big driving wheels, getting the longest stride for each stroke of the cylinder. However, this had a consequence that the bigger the driving wheels, the higher the axle center. The higher the axle center, the higher the boiler above it had to be placed. High boilers made for a top-heavy locomotive, which became unstable at high speeds, and prone to sudden upright existential crisis.


Crampton’s solution was to design a locomotive with a single stupidly large driving wheel with it's axle behind the boiler instead of underneath it. Crampton’s locomotive had low centers of gravity and better stability. The idea spread, and very soon Crampton locomotives were hauling fast passenger trains in England, France, Belgium, and Germany. In France, they became so popular that “Le Crampton” became synonymous with “Locomotive.”


In 1850, the Syracuse & Utica RR came knocking on the front door of the new Schenectady plant and wanted a fast locomotive. Septimus Norris knew exactly what to give them. Using his new 'jacked Crampton plans he rolled out the “Lightning,” a 20-ton machine with a set of 84-inch drivers, a pair of ridged carrying wheels under the boiler, and his own spin on the remix, a 4-wheel pilot truck in front. The locomotive had English-style Gooch valve gear, and as if flexing on his master of design piracy, Septimus even included front buffers instead of a cowcatcher and no cab.

The machine was tried out in January of 1850, and it flew as fast as the track— newly upgraded from wooden stringers and strap rails on blocks of stone, to iron rails on ties— would allow. Septimus and the Norris organization advertised the locomotive to be the beginning of a new age of American motive power. That must have been a thrilling ride being so close to the drivers with a open cab! I feel like the engineer learned real quick to keep his arms in.
The Lightning herself.


There was just one problem, well...okay a few problems including this things propensity to de-limb it's crew, but one major one. All the weight of the locomotive was carried on wheels other than the drivers. So adhesion and traction were virtually nil. All Cramptons had this issue. In Europe, where trains were short, cars were light, the land was level, and the roadbeds were advertised as billiard table, this wasn’t a problem.


However, on the Syracuse & Utica, the “Lightning” could barely pull her own shadow with a set of heavy American-made passenger cars chained behind her, The S&U’s primitive roadbed made the locomotive ride like a car-sick ten year old, which exaggerated the formally mentioned problems of being in an outside cab. To add insult to injury, the locomotive's design couldn't even achieve the high speeds it's American-designed counterparts could hold on the same track, and it's rough handling at the speeds it could reach caused the locomotive to constantly be in a state of self-disassembly. After a few months, the S&U’s management pulled the plug, and the “Lightning” was sidelined until she could be rebuilt into a conventional 4-4-0.


The “Lightning” fiasco was big news in railroad circles. There were other experimental Crampton designs tried by the Camden & Amboy RR, the Pennsylvania RR, and the Vermont Central RR. None seemed to work any better.


Septimus Norris’ reputation as a builder of locomotives was the real victim. Who wanted a locomotive from a builder who flopped as dramatically as Septimus? Trying to hock someone else's design no less. Poor Septimus went from an up and coming designer to a laughingstock. Customers at the Schenectady works took their business elsewhere, and Septimus and his brother Edward were forced to close the plant doors in 1851. Septimus Norris continued to build locomotives at the original Norris factory in Philadelphia until a “carbuncle” took him out in 1862. However, his reputation as a designer would never really recovered.


There is a silver lining for Schenectady Works. The works would reopen later, under the hands of John Ellis and Walter McQueen. With sound construction and more traditional designs, they made the operation into one of the nation’s largest. Including building the Jupiter and her sisters of Golden Spike fame. The Schenectady Works would eventually become the heart of the American Locomotive Co. after the turn of the century.


Man, isn't it a right bitch when your entire career, which is highlighted by such innovations that would last to the end of steam power, is reduced in history book to a few paragraphs describing your worst decision. The story of the “Lightning’s” failure is repeated in locomotive books to this day. 

Wednesday, August 21, 2019

The Dear Estate, 3


When we last left off, windows were going in, final paint touch ups were being made, and the house was getting some interior detailing in the form of curtains and black walls. 

I drilled a few holes in the bottom of the base, and ran two warm glow LEDs into the house. These give off a very soft glow that lights up the kitchen, and the parlor. I figure at night, it was better to have a warm hint of gas-lamps burning then to have the house lit up like Christmas. As Lady and Tramp would have a hard time sleeping (and Jim Dear's gas bill would be through the roof) if it was blazing with light. However, a future project could be to add a Woodland Scenics Just Plug Lighting System, and be able to control the lighting. However, that might have to wait until a full scale layout for the model to find a home. 

I did try to take photos of the lighting rig, but it turned out my phone was set to record. So, no photos were taken. Instead it was a bad-video. Oops. 

Once the diorama base had it's static grass dry, the house itself went onto the footprint and was anchored down with a few daps of liquid nails. Should it ever need to come up again, a putty knife will be all that is required. We ca now turn our attention to the landscape.

The grounds around the house seem to change as the films progress through the seasons. As I made a note in the second installment of this build, as the Lady and the Tramp franchise covers a point of time of about five years, and the house seems to go through several stages of decor and grounds-keep. In the first act of the 1955 film, the house is immaculate. With plenty of plant life, shrubs, and flowerbeds. In the second act, during the birth of the baby, the house's grounds become a little plainer. With more general shrubbery. More then likely, keeping up with the flowerbeds was put on hold for the arrival of the baby. The house remains like this until the 2nd film, which seems to have a happy middle-ground between a highly polished and well kept yard, and the reality that seven dogs live here. A nice touch from the Disney crew.

As I'm modeling the house as it appeared in the first film, I decided to keep the grounds simple and aim for a point in time towards the end of the film. The Tramp is a member of the family, and he an Lady are expecting their litter. The grounds are well kept, Darling has her flower beds, yet the immaculate pruning has given way to things being a bit more easy to keep. With a child in the mix, and four pups on the way, there isn't much time for extreme garden makeovers .

A blend of Woodlands Scenics bushes and ground-foam mixed with Scenic Express Leaves made up the shrubs, which boarder the house on all four sides, as well as make up the majority of the garden between the brick sidewalk and the house itself. A few vines grow up the back side of the house above the cellar door. (One would think after the midnight rat-invasion, these would be pulled down....oh well. I guess seven dogs in the house might keep the rats at bay.) 

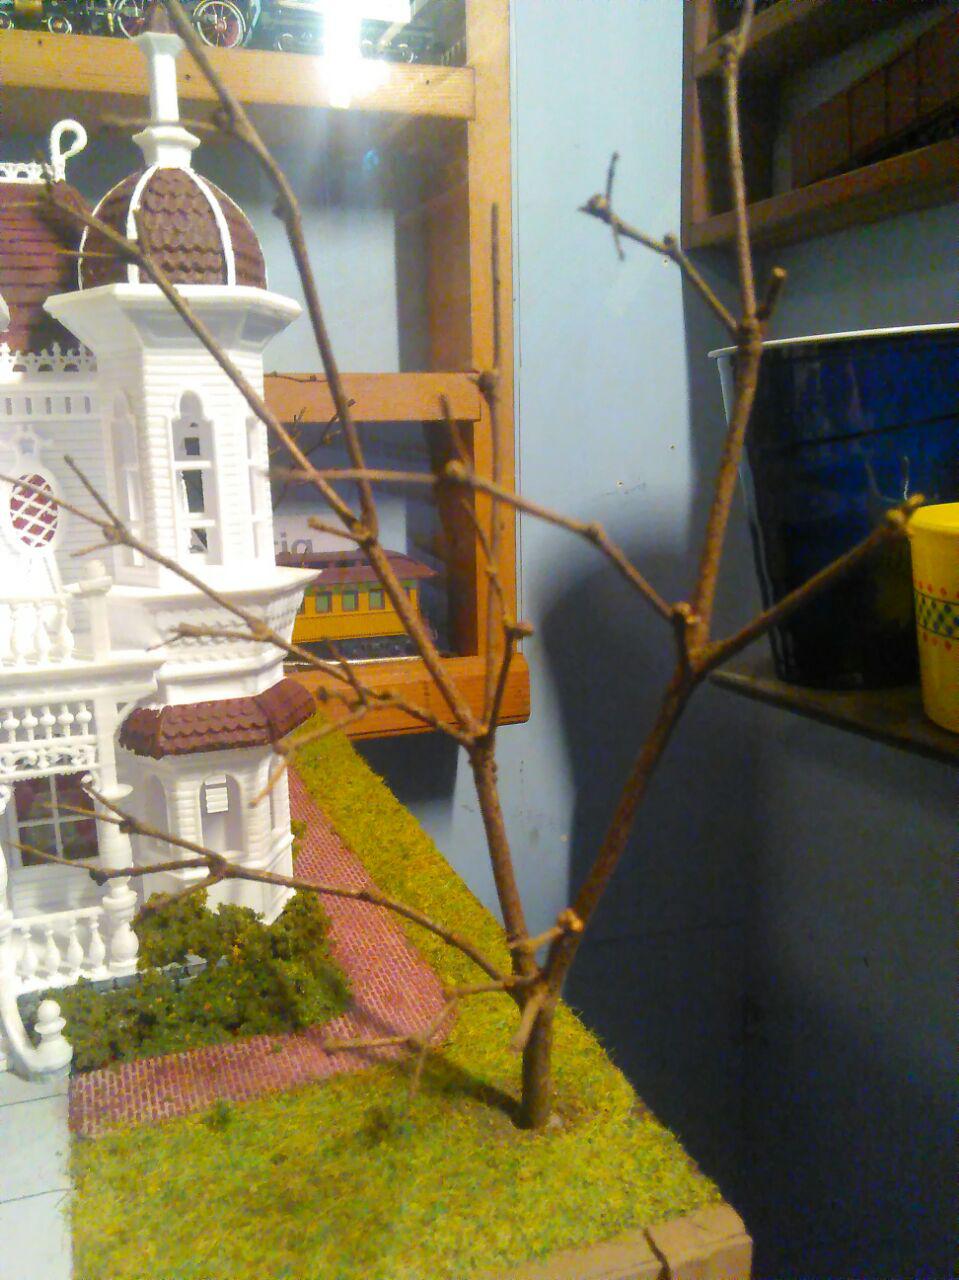
Time to turn to the trees. Trees can make or break a model, as well as set the tone for the season and location. In my side yard, I happen to have a bush that gives off some very nice twigs that can be turned into scale armatures for trees. I've seen some people use salt-bushes for trees with larger trunks, as well as use magnolia plums to even represent the foliage. I try to clip my trunks from branches that are already dead, but one can clip the foliage off and dry out the green wood if need-be. 

I fill two tins, one with fine turf from Woodlands Scenics, the other with coarse turf/bushes. Using a spray adhesive, I hit just the branches of the armature, careful to be sure I don't spray the trunk itself. The armature is first dipped in the fine turf. Sometimes I even roll it around and fluff the turn up and over the branches burying them. This provides the foundation for the much larger coarse turf material. Another spray over the armature again, and into the tin of coarse turf and bushes. There is no number of dips or sprays, now amount of material. You just keep going until you feel happy with the result. I tend to try and keep an airy feel, rather then load the branches up. However, in some cases, branches will gather more material then others. There is no right or wrong, and much like nature, each tree will have an individual look.  
 
Once the tree has enough material to satisfy me, a final spray of adhesive is done to coat the whole tree. I use Krylon Artist Spray, Acrylic Crystal Clear. This tough, clear finish does not yellow with age and it protects color with a moisture-resistant finish that holds the material in place and seals it. I've seen other modelers use hairspray, however I've never had much luck with that. 

Now, a word of warning...these trees will shed, sometimes over the course of a few days, as things settle and the finish seals. The finish will protect the majority of the material in the branches, but I tent to leave the trees in a foam base in the garage to dry out for a few days before using them. Just to be sure that all the loose material gets gathered up for re-use.
Once the trees are finished, I fill the holes in the base with a dab of hot glue, and slip the trunk into it's final placement. The films show two trees in the front yard, one tree in a corner of the backyard, and one tree in a side-yard. 


The final touch is the wrought iron gate and fence in the front yard. The one that Jim Dear never keeps open. The design of this gate...once again...seems to change slightly from film to film, or even from one animator to another. It has a few basics, like the side fences being much smaller and shorter then the gates. More then likely due to the height of the retaining walls making up for the lost height in the fence itself. I had a gate left over from another project, and I decided to make the fence itself from cardstock. I first drew out the design in led pencil to make a small template. Then, the template was used to draw the same shape repeatedly on the card-stock until I had the length I required. 

Now, comes the tedious part. Using an X-acto blade, I carefully cut the fence out. There is no real way of making this process go fast. All once do is put some tunes on, blank out to the rest of the world, and get it done. I actually made far more then I needed, but I wanted to have some excess in case I effed up somewhere. 

The fence was glued in place to follow the retaining wall, and the gate went in, glued in the open position so that it wouldn't obstruct the view of the front of the house when viewed at street level. (Lady must be visiting Jock and/or Trusty) 


The last touches where a few outdoor details. Such as the post for the laundry in the backyard, the water barrels under the gutters, and a few flowerpots on the porch. The last thing done to the model was some black dry-brushing around the chimney, and some dry brushing on the room to bring out the edge of the shingles. 

After four months of build, plus far more time in planning, the Dear Estate is as complete as it's going to be for the moment. This experiment in 3D printed model-making brought upon a number of lessons for those thinking about using the medium for large scale modeling. I have to extend a big thank you to Chris and the guys at GoldRushBay Models for getting this thing off the ground and providing the means to design and print. Their prints are fantastically crisp, clear, and finely detailed. The fact that they do custom work is the icing on the cake and I can not recommend them enough for what they do. 


However, I can not say that this style of model building is any easier or cheaper then the alternatives. On one hand, The advantage of 3D design is that it does allow for a clearer idea of what the final product will look like. If designed properly, assigning the right relationships to dimensions, changes can be made downstream that will allow the entire design to be updated with a simple input of a number. Really, a good 50% of the build occurs in this stage. Between gathering the material from the prototype, and then processing that into a printable model.

However, it doesn’t make the process of building models any faster, in fact it is much, much slower. To design a structure, especially one like the Dear House with all it's Victorian architecture, it takes a fair amount of time.  Far more than most people imagine. The advantage of the printer is that once the design is complete and tested, you can create a very finely detailed structure that conforms to all the complexity of a prototype. Then, after printing comes all the prep to take the model to a standard of presentation. Cleanup, sanding, more clean up....more sanding. Hours with a dental pick going at tiny little lines of filament. (and I'm still not convinced I got all of them) then, painting the unit as a whole is a study in patience and skill. If I had to do this project again, I think I would have tried to have the print done in multiple parts that could be glued together. Just to give better access and ease of cleaning and painting.

The finished models always looks fantastic, if the design is done correctly.  But it is by no means an effortless or quicker way to get a scratch built model, just a more rigid way to scratch build a specific model. 


           "We've made a home from which we'll never roam.
 
In our small, little, not too big
Little, homey, nice, little
Quaint, little, Always friendly home,

Welcome!!" 


Monday, July 29, 2019

The Railroad Riots of 1877

I would like to take a moment and look back in time to an event that shook the growing 19th century railroad industry Exactly 140 years ago this week, starting on July 21st, 1877, the height of the Railroad Riots reached its violent peak in Pittsburgh Pennsylvania. This strike had a profound effect through the railroad industry and has a legacy of violence and chaos unmatched. 
Pittsburgh PA, circa 1877


By the 1870s, the railroads, which were at the time the second largest employer outside of agriculture, demanded sacrifices of large amounts of capital investment for their construction, and thus entailed massive financial risk. Men of purpose who were part speculator, part gambler, poured large amounts of money into the industry, causing abnormal growth and over-expansion. Many northern banking firms invested a disproportionate share of their depositor's funds in the railroads. In 1873, this finally blew up spectacularly when the offices of Jay Cooke & Company declared bankruptcy. Thus kicking of the Panic of 1873.

The public's emotions behind the big railroads were abundantly clear
In the wake of the Panic of 1873, a terribly bitter antagonism existed between workers and the leaders of industry. Mass immigration from Europe and the existence of thousands of freedom searching able bodied men allowed the railroad companies to drive down wages and easily lay off workers who spoke out. By 1877, 10 percent wage cuts, distrust of capitalists and insane working condition and hours led to workers getting more and more fed up. Management worked to break up such movements, usually with harsh and often violent results. Tensions built up on this powderkeg until the fuse was finally lit.
The Union Depot of Pittsburgh before the riots

The Great Railroad Strike of 1877 which was aptly referred to as the Great Upheaval by those who got to enjoy the party, began on July 14 in Martinsburg, West Virginia after the Baltimore and Ohio Railroad sliced wages for the third time in a year. The strike spread like cancer, and soon the whole industry was either striking, on the verge of striking, or joining their neighbors who were striking.

Finally, on July 21st the city 0f Pittsburgh Pennsylvania and the Pennsylvania Railroad snapped.

After being forced to take a reduction in wages, railroad workers awoke on July 19 to find that the company announced that it would implement the practice of double heading (joining two small trains of cars into one large train powered with two engines) for all of their trains moving through Pittsburgh. This screwed over train crews by favoring one crew handling two trains, while increasing the workload of that crew. That very same day double heading was to go into effect, the (no doubt shaking in his boots) superintendent of the Pennsylvania Railroad at Pittsburgh issued an order that, according to strikers, effectively doubled the mileage of what was considered a day's work, increasing it from 46 miles to 116, without increasing the size of the crews.


This meant that the company would be able to discharge fully half of their workforce.

One crew, led by Conductor Ryan, put their foot down and gave the railroad the middle finger. The company called for replacements, who when they refused to act were immediately fired. The powder-keg exploded. Freight trains were stopped in the yards, and a crowd of rioters took possession of the company's property at the 28th Street Roundhouse. 


The remains of the roundhouse.
The 18th & 19th regiments of the PA National Guard were ordered to Pittsburgh to protect the company's property. This stirred the rioters to a fiercer anger. The troops arrived on July 21st and were met by the growing mob. The riot act was read, and an attempt was made to arrest the ringleaders.  A cry arose of "Stick to it; give it to them; don't fall back!" and some protesters began to throw rocks and fire pistols at the troops; several men were injured, at least one seriously. The General ordered his men to charge and open fire on the crowd! The troops returned fire and used their bayonets, beginning with a single unordered shot, and continuing in a volley for nearly ten minutes.

Burned locomotives

An estimated 53 rioters were killed (including three children), and 109 injured, although many injured hid their injuries to conceal their involvement in the mob. Eight soldiers were killed in clashes, and another 15 were wounded.The militia then took charge of the Roundhouse. After the rioters captured all of the guns from the local Hutchingson's Battery, they fired several solid shots through the roundhouse in which the militia had taken refuge. The rioters then fell upon the rail yards, set fire to train cars and engines, and prevented any effort at extinguishing them, in some cases at gunpoint. Meanwhile, other rioters set cars
afire, and after saturating a railcar of coke with oil & igniting it, they succeeded in running it into the Roundhouse. As one member of the mob phrased it: "We'll have them out if we have to roast them out."

As one soldier recounted: "It was better to run the risk of being shot down than burned to death, and so we filed out in a compact body ... It was lively times, I tell you, reaching the US Arsenal ... I thought we should all be cut to pieces!"


Later, on July 22, a burning rail car was run into the Union Depot and the building set alight. A grain elevator nearby, the Panhandle Depot on Grant St and a locomotive shop on Quarry St were also burned to the ground, and before sunset, every railroad building & car in Pittsburgh had been destroyed. Looters then turned their attention to the Cincinnati & St. Louis Railroad,as well as the steamboat docks, and when the goods there were carried away, it too was set on fire.

Union Depot after the riots...


The strikers exerted such total control over the area that on July 24, when the governor passed through the area, it was only with Robert Ammon of the Trainmen's Union's blessing that he obtained safe travel.

On the morning of July 23, and there was a great anxiety as to whether violence would continue. Many prominent members of the town had set to work organizing a militia, and by this time several thousand had been gathered and were put under the command of General James S. Negley, a veteran of the Civil War.


On July 28, Governor Hartranft arrived in Pittsburgh with fresh militiamen from Philadelphia, in addition to 14 artillery and 2 infantry companies of federal troops. This suppressed the rioters, and two days later the railroads began to resume operation.


Estimated damage was close to $92,000,000 when adjusted for inflation.

One has to wonder about the level of anger throughout an entire community that would cause destruction of this magnitude. Both wide and deep. Today's labor laws and safety centrist world has a lot of blood on the foundation of which it's built. It pays to remember that. 


Thursday, July 4, 2019

The Atlas Turntable


With all the work rebuilding and retrofitting the turntable at Marceline, I figure it wouldn't hurt to take a moment and discuss the product that the turntable started out as.  


The Atlas HO scale turntable, as seen right from the box.
The Atlas Turntable has been around since, I dunno, the 1650s. There's some drawings of it on a cave in France. Over the years it's been updated and upgraded. The original turntable, for example, had 30-degree indexing between the stall tracks, while the current crop has 15 degree indexing. As a model, it's reliable and rugged. It can be turned using the massive handle, or it can easily be motorized with an available kit. The motor kit mounts simply and easily, and the new one has been perfectly reliable so far. The turntable itself automatically accounts for track polarity as you turn it, so you don't need a separate reverser if you're using DCC. Some other turntables do need one. If you do run DCC, you will need to reacquire your loco when the polarity flips, and, although I don't run sound, I've heard that the sound has to be restarted, and that would make sense.

Also, but not mentioned, the indexing is spot-on every time. The thing about the indexing is this; it uses a cam lock type mechanism with a genevieve gear, which means you stop for a moment at every position as you go around, whether you have a track there or not. This can get aggravating after a while.   

So, all that being said, if it's so reliable, why did we break not one, but two of these sucker? Most of the objections are about the looks. It is a type of turntable not used a lot on the prototype. A decked over turntable pit is a rarity, although not unheard of. These would usually be found in places of heavy snowfall, as shoveling out the pit would be a time-consuming and labor intensive activity. As it come right of the box, the hand-crank is massive and obtrusive. A glaring real world addition to an otherwise model world. Many people like the mechanism though, so, like we did at Marceline, they make a pit and modify a bridge and mount the whole thing on top of the Atlas mechanism. Others dress up what's already there.

For me, I'll take bulletproof every time over bells and whistles.