
Going forward, I made a slight change in the track plan. Moving one of the service tracks in order to allow better access from both the mainline, and eliminate that wonky curve. Originally, I wanted the mainline and the service track to be separated by the water tank, sand-house, and coal-stage. This required the service track to curve around the structures so that it can link back up with the main on the other side. As we laid down the center-line for this track and started putting ties down, the further along we got, to more out of place it seemed.


Ultimately, there will be some expansion off this module, and more then likely it will be to the right. The track that comes off the turntable and runs alongside the roundhouse is not just a whisker track, but will run alongside the main, through a double crossover, and become the lead to the yard I hope to build in the future. This will allow the yard to be switched, and locomotives to move from the yard to the roundhouse and vice-versa without ever fouling the main.
Marceline's location on the fictional W&A RR would land it somewhere between the real world towns of Resaca and Tilton, with the next big yard being located at the equally fictional town of Curtis Switch.
****************
 |
| All Aboard! |
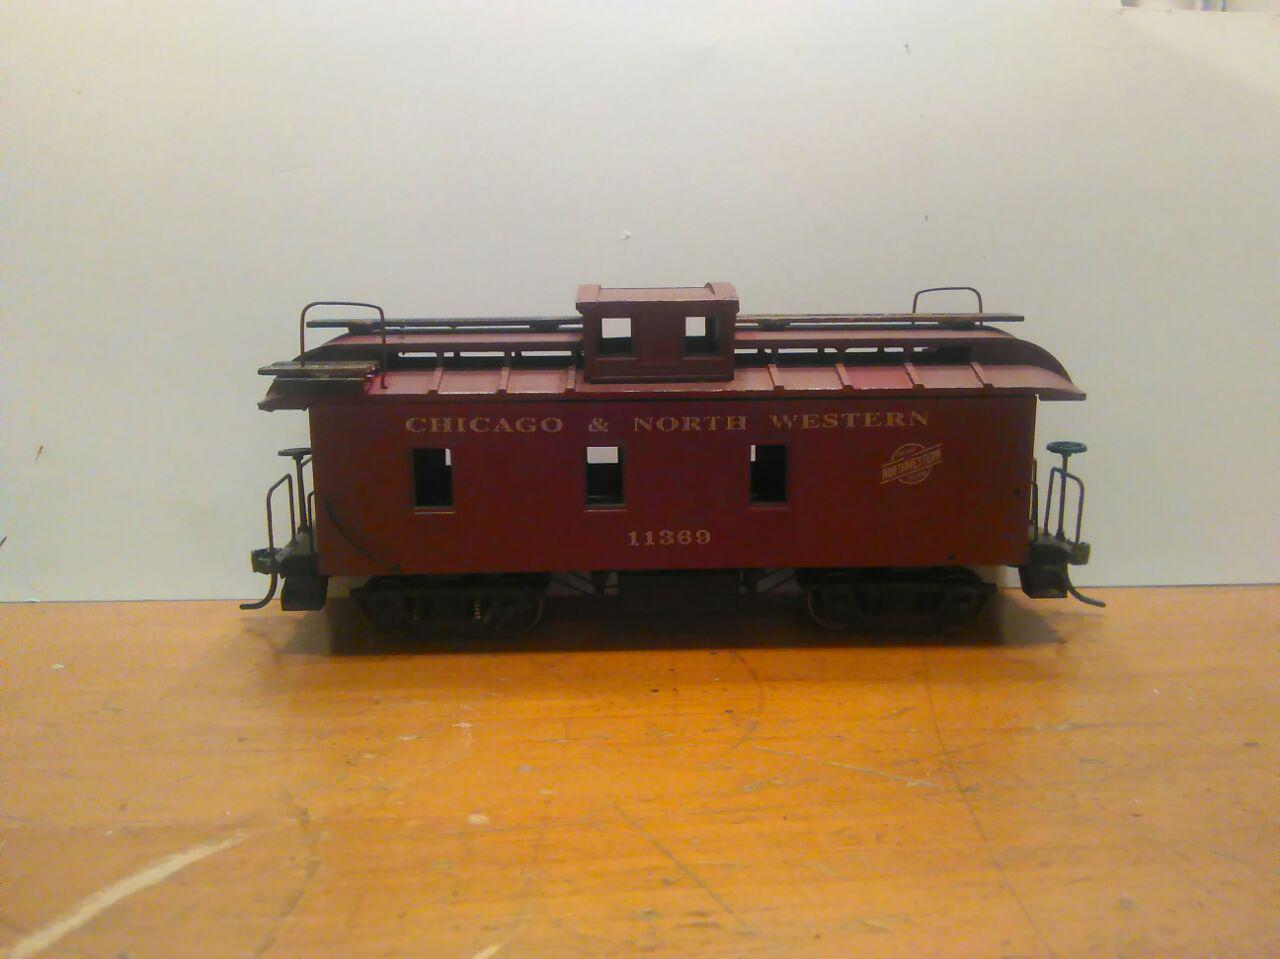
For this project, I wanted something a bit different. Cabooses at the turn of the 19th century were the home away from home as well as the rolling office for the train crew. The conductor kept records and handled business from a table or desk in the caboose. The crew could exit the train for switching or to protect the rear of the train when stopped. They could inspect the train for problems such as shifting loads, broken or dragging equipment, and hot boxes (overheated axle bearings, a serious fire and derailment threat).
For longer trips, the caboose provided minimal living quarters, and was frequently personalized and decorated with pictures and posters.
 I wanted a neat caboose that eked character, but also was capable of having it's roof plucked off in order to have a detailed interior. I have a personal rule about detailed interiors. Unless it can be seen fully, there is no point to them. Usually, I do "shadow boxes" in my structures and rail-cars. Just black outlines and forms to suggest an interior without going to extreme lengths. With this car, I wanted to do a full interior, and thus, it had to be accessible.
I started out with a Roundhouse Caboose kit. These cars are very nicely molded, and make great starts for kit-bashing. I wanted to have a clerestory in this car, and I drummed up a spare MDC Overton roof. (Finally, something useful from an Overton. I'll make it no secret that I find the Overton to be the most useless piece of HO scale equipment ever. But...another time.) After cutting in a space for the kit's cupola, I fit all the bits together and sat back. Looking nice.
 The original trucks got replaced with passenger car trucks from the Overton, and the roof got some detailing in the form of some panel struts. With the basic structure complete, it was time to focus on the interior. I wanted to base the inside on a caboose I spent a lot of my teen-age time aboard, and while it's a more modern car, the basic style and amenities translated well to a 19th century look-alike. The floor was made from basswood scribed with "planks", and stained with a black wash.The majority of the car was going to be painted an off-gray, but the floor was going to be left as bare planks.
 Using a Micro-mark chop-it, I cut the panels, struts, and sides for the cupola seats from strip-wood and basswood. The seats themselves were made from the same scribed wood as the floor. I know, some folks might question why the cupola dosn't have "seats", however the prototype car likewise didn't have true seats. Rather, just a set of long benches, without padding. I imagine this made for a rather hard ride. Ladders up into the cupola were made from plastic leftovers from the original kit.
 The desk was made the same way, and a few panels to represent the bathroom, pantry, and storage cabinet went into place. A single bunk was installed, and the whole thing painted. One must assume that with one bunk, "warm bunk" rules were in place, where someone was awake at all times.

Returning to the roof, I started work on a set of running-boards that would run the length of the clerestory, as well as a set of hand-railings. These where made board-by-board, with the wood handcut via the Chop-it. (I can not recommend a Chop-It more. I use bass and balsa wood a lot in my builds, and this tool gets used a lot.)
 The handrailings were made from wire, with holes drilled with a pin-vise. Once the wood was in place, it was time for the first coat of paint, and stain.
 I've had a love-hate with wood stain. I know some modelers have had a lot of luck with the stuff, but I've never had a knack for it. Preferring to use washes rather then full on stains. With this model, I decided to do an experiment. One of my fellow modelers has used a "stain pen" on some of his models, and to great effect. I found the same pen at Wall-Mart, and figured this was as good a chance as any to give it a shot. For whatever reason, it had a nasty reaction to the wood, and instead of being a nice stain, it rose to the surface as a thick sticky mess.

Uh Oh.
 I ended up letting it dry fully, then sanding it down to try and control the thickness. After a few times sanding, it was looking no better. So, in the end, the same paint used on the car sides ended up going down over the running boards. I did a light dry-brushing over the boards once the paint had dried to help them stand out. The end result wasn't bad, so I moved on.
 With the interior more or less complete, it was dropped into the car, and the inside of the car was given a nice coat of gray. I need to find a potbelly coal stove, and a few other small details, and then the interior will be finished. I also need to work on glass in the windows.
So far, I'm really pleased with this car. It's painted in "oxide red" with "cream" doors, which the scheme I use for my W&A RR's hacks. Historical records (as of this writing, I'm still searching) seem sparse as to what the W&A had on it's cabooses. One has to imagine the traditional red with perhaps white lettering. I have thought of their cabooses perhaps being painted the same as early passenger cars, which was a yellow with red lettering and trim. Perhaps this car could be an experiment for this.

Perhaps...
No comments:
Post a Comment