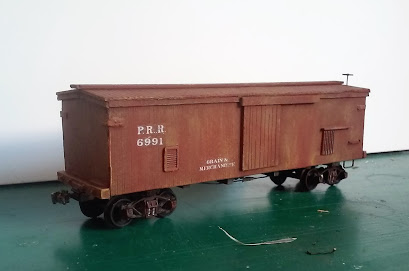
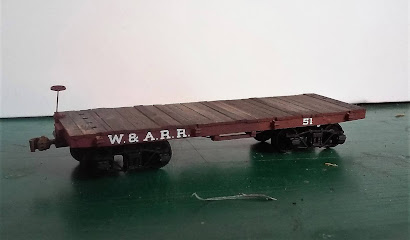
While under lockdown, I attempted to use my suddenly available time productively. I was able to land a number of Central Valley, Labelle, and Roundhouse/MDC kits. The CV and Labelle kits were craftsmen wood kits, while the Roundhouse/MDC kits were plastic and diecast. Sitting down, I started assembling these kits one by one, and in about a month, I had a nice fleet of new cars ready to enter service.
An Xacto knife and sandpaper is all you really need to put any of these kits together. The NWSL Chopper is nice, but not essential. I never used a miter saw for any of these. To help with the roof ends I made a carstock template to guide my carving efforts. One can make one from just a piece of heavy cardboard, or plywood, or Masonite, with the desired curve cut into it for the cutting blade. Use of a template helps to get both ends to look the same. Take it slow and frequently compare it to the provided documentation and you'll be OK. The worst that can happen is that you'll may end up building another piece of roof stock from leftover supplies on hand. (Don't ask me how I know that. Just know that I do.) Prototype wooden roofs were covered with a layer of canvas and then coated with tar. So, any mistakes can be simply covered.
 |
| Central Valley Ventilated Boxcar Kit. |
 |
| Central Valley Boxcar Kit. |
 |
| Central Valley Refrigerated Car Kit. |
Central Valley kits are remarkably simple to construct and for their age are decent kits. These kits of Box cars, Reefers, Ventilated Box Cars, and Cabooses were basic wood kits which come with pre-formed and carved wood bases and blocks for the floor and car frame, the ends, and the roof. Traditionally these kits contained all the basswood and soft metal castings required. With pre-printed and pre-scribed wood sides, roof, and ends. The printing on these cars runs the gauntlet of quality. With some carsides being crisp and sharp. While others are dull and blurry. Metal details and the famous Central Valley Trucks with Snap on bolsters are included with each kit. The user was expected to buy trucks and couplers separately. Central Valley made the trucks, but alas they are no more, and it takes some scrounging to find appropriate trucks now-a-days. I tend to replace the metal details with Tichy NBW and brake equipment. As well as replace the brass rod with fishing line for the truss-rods. These make very nice cars that ride well and can be modified to fit a number of prototypes. On the downside, these are old kits. The printing on the carsides can be rather crude. The trucks that come with the kits are clunky and sometimes ride awkward and will require adjusting. A lot of the old casting have imperfections, and as I said before, I tend to use Tichy hardware for this very reason.
 |
| Central Valley Boxcar Kit |
I've built a few LaBelle freight cars and while I love the results, the construction can be a bit of a headache. The kits came with everything except trucks and couplers. I found the destructions confusing, with drawings that are not scale to the parts provided, and the construction methods were straight forward, but made all the more challenging by wood parts and blocks that clearly were planed with old tooling. Warping, odd sizes, and uneven thicknesses abound with Labelle kits.
 |
| A LaBelle 34 foot boxcar |
 |
| Labelle 34 foot boxcar |
When it comes to painting these kits, one must remember that wood is porous. The varied grain of the scribed siding wood will absorb paint at different rates. LaBelle kits generally use a very good grade of scribed wood, but there is still a possibility that the grain will show through the first coat of any paint. Central Valley cars tend to be pre-printed, so too much paint will obscure detail and grain. One can either use a primer coat or a light application of your main color first - allow that to dry completely - and then a second coat. While the single coat may create a weathered appearance, that wood grain issue remains and I've found it better to use two coats of paint and then go back and apply light weathering if desired.
Also recall that dried glue does not absorb paint. Careful gluing is important on these kits to keep the glue from spreading out on surfaces that will be painted. The "second coat of paint" process can help to cover problems, but it is better to avoid the problem as the paint almost always appears more glossy on the spots covering glue.
I also finished two more of the Crown Point flatcars kits. I covered these kits in an earlier review. I put Tichy trucks under these ones.
A few kitbash projects were likewise knocked off the shelf. Such as this tankcar built with a brass shell found in a parts bin at a local hobbystore atop a scratch built car-frame and body. The flatcar with load was built from an AHM flatcar lettered for the local "Stone Mountain Railroad"
 |
| Roundhouse/MDC boxcar |
Roundhouse/MDC, and later Roundhouse under the Athern banner, produced a number of 34foot wooden boxcars with trussrods. These cars are typical of 1890-1920 construction, while easy to backdate into the late 1880s. The kits are easy to put together, as they often come with a cast metal frame, plastic spru of parts such as the running board, queen-posts, and brake equipment, an a large body shell. I tend to replace the plastic parts with Tichy hardware, and use fishing line instead of thread for the rods. Otherwise, the cars go together as instructed. Sometimes with a few small details car to car. These are cheap and cheerful cars, and make fine runners.
Well, that's all I have for this post. I'm back at work, so long spans of hobbytime are over. I have plenty of projects in the works though, and I can't wait until the pandemic lifts so I can return to the model railroad club and give my new freight train's worth of rolling stock some run time.


No comments:
Post a Comment